Showing posts with label tomatoes. Show all posts

Tuesday, September 28, 2010

Leftovers for Breakfast

I think I've mentioned here before that I don't often make breakfast. If I wake up early enough that breakfast is warranted, I either get a latte or eat whatever's left in the fridge from the past few nights. For example, this morning I ate a slice of cold pizza! And I know I mentioned eating the leftover yaki onigiri cold for breakfast. I'll also eat stir-fries, salads, baked goods--whatever is there and doesn't have to be prepared beyond maybe heating up for a minute or two.

Anyway, after a super late night on Saturday (Mike and I didn't get home until 4am after Cabaret and it was soooo amazing and Amanda Palmer puts on a damn good show and I had a drink with absinthe in it and it turns out I don't like absinthe), we slept late and I was in the mood for a real breakfast. Enter the leftovers from the night before--I was really glad, in the morning, that I'd been too rushed and afraid to make the Chicken Creole with an entire cut-up chicken, as per Becky's recipe. Because we ate all the chicken that I cooked in it, we had a whole bunch of the sauce left over, and I had a vision for that sauce.

Creole-Poached Eggs.

With well-buttered rye toast from my favorite bakery.

The recipe for this is basically "make Chicken Creole, have leftover sauce, crack some eggs into it and simmer until the eggs are cooked to your liking." It took maybe 15 minutes to whip up and we had a wonderful Sunday breakfast. At 1pm. And as far as I'm concerned, that's still breakfast because I had to drag Mike out of bed for it. (Hey, it was really only around 8 hours of sleep.)

This has completely cemented in my mind the importance of making big one-pot meals. You can poach eggs in the leftovers. I intend to try to find something else that I can do this with soon, because runny yolks mixed with vegetable-y sauce on delicious bread is possibly the best way to have breakfast, ever. And that huge pile of food is almost completely vegetables! It's even healthy!

Okay, so I'm super excited remembering this and now I'm sad that I don't have anything to poach eggs in for dinner. (And I really want to make huevos rancheros soon!) What does everyone else here eat their eggs with?

Friday, September 24, 2010

Taste&Create: Chicken Creole

It's time for this month's Taste&Create! This month, I was paired with Becky of Baking and Cooking, A Tale of Two Loves. I went through her archives and found that her very first recipe, "Sunday Chicken Creole," is exactly the type of thing I would do if I knew anything about 1-pot cooking, which I don't. But looking over the recipe, I was pretty convinced that I'd love it: peppers, tomatoes, onions and garlic. I mean, that's how I cook. So I'm pretty sure this is at the last minute (or perhaps even late--which I feel bad about, but my classes are INSANE this semester; I think I'll be not doing Taste and Create for the next two months).

So basically, this is an extremely easy meal. And people around me are talking too much for me to type (and I'm in a huge hurry, as usual), so here's a recipe and some pictures!

RECIPE: Chicken Creole
adapted very slightly from Baking and Cooking, A Tale of Two Loves

Ingredients:
-4 large chicken breasts
-3 tbsp olive oil
-2 cups chopped red onion
-2 small green peppers, chopped
-4 sticks celery, chopped
-5 cloves garlic
-2 tbsp chili powder
-2 tbsp paprika
-1/2 tbsp smoked paprika
-2 28-oz cans whole tomatoes in puree (Cento's San Marzano tomatoes are in puree; I found that they generally didn't say what the tomatoes were in unless you looked closely at the ingredients. If you can't find them in puree, drain the liquid and use a can of tomato sauce.)
-1/2 cup white wine

Instructions:
1. Chop the peppers, onions and celery. Put them and the minced garlic in a large stockpot with the olive oil and saute for three minutes.
2. Add the paprika, smoked paprika and chili powder and cook for another three minutes.
3. Put in the wine, tomatos, black pepper and chicken. Simmer for 35 minutes until the chicken is cooked thoroughly.
4. Serve over rice.

Step 2!

Also step 2! This smelled so good. I'm just discovering a love for paprika--it's so exciting!

Step 3: It's almost done! Yay!

You can't even see the rice. I should have made more, but this was delicious! I was happy with how it came out.

I tend to chop everything up and mix it together. It worked pretty well for this. The chicken was super tender and all the flavors had fully permeated everything. It was delicious!


Hah! Simple. Dinner that takes less than an hour, and it's so easy for a weeknight when you don't have a lot of time. Which I don't. And even the blog post didn't take much time! YAY! Mike and I are off to see Cabaret now, so go check out Becky's blog--she's got some great recipes on there! (She's got bacon cupcakes in there somewhere, too!)

I hope everyone has some exciting plans for the weekend! I'll be doing statistics homework and writing papers, so I'm glad I'm at least starting it out on a good note!

Friday, August 20, 2010

PGG's Panzanella

It seems like forever ago that I told you all to buy the Poor Girl Gourmet cookbook. Have you bought it yet? Because if you have, then this post is probably completely unnecessary, but if you HAVEN'T then I'm sharing my new favorite recipe with you. (I'm not quite sure if it's my absolute favorite, but it's definitely up there.)

Panzanella is a bread salad based in the idea of "cucina povera"--poor cooking. This also includes things like Minestrone, so I'm pretty sure Italians are just geniuses when it comes to cooking with not much in the way of funds. This is the recipe that I spent about an hour staring at after I bought Poor Girl Gourmet, trying to figure out exactly how it worked (bread salad? really?) and what "ricotta salata" was (and whether my grocery store would carry it).

There are lots of reasons to make Panzanella for dinner. Have some day-old bread? Excellent. Don't feel like actually cooking? Great! Leftover chicken? Wonderful. Tomato/basil/mint plants going crazy? Perfect. In the mood for a light dinner? Well, here you go! Seriously. Any excuse is good enough and this is the easiest thing in the world to make and toss together. If you don't have day old bread lying around, there's probably a rack of day-old baked goods at your grocery store. There isn't one at mine, of course, but that didn't stop me--I just sliced it up fairly thick and toasted it first. (I mean, toasting is sort of the same thing as making bread go slightly stale really quickly. Sorry if I just ruined toast for you.)

I only have one picture here because it's way too easy to require multiple pictures, though if you really want pictures of bread cut into cubes then I'm sure I can get some to you next time I make this.

Hmm. It doesn't look nearly as completely gorgeous as it tastes, though it looks better in the cookbook. This is also before I figured out the right setting on my camera. Anyway, if this picture doesn't look mouthwatering to you, ignore it and try the recipe.

RECIPE: Panzanella
Adapted very slightly from the Poor Girl Gourmet cookbook

Ingredients:
-1/2 lb day-old bread (the cookbook recommends ciabatta, which my grocery store doesn't sell--I went with a completely different country and used a multigrain boule, and I'm sticking with it)
-3 medium tomatoes (large on the vine tomatoes)
-1 medium shallot
-1/4 pound feta cheese crumbles (book recommends ricotta salata; again, my grocery store doesn't carry it, but I love the feta)
-1/4 cup fresh basil, chopped
-1/4 cup fresh mint, chopped
-2 leftover thin-sliced chicken breasts (or equivalent amount of cooked chicken), shredded (this is completely my addition and therefore you can leave it out for a vegetarian version)
-1/4 cup extra virgin olive oil
-1/4 cup white wine vinegar

Instructions:
1. Chop the bread and tomatoes into cubes. Put them in a large bowl. Mince the shallot and add that, along with the feta, basil, mint, and chicken. Let sit for about 20 minutes to half an hour.
2. Mix together the oil and vinegar in a small bowl. Pour it over the bread salad. Stir. Eat.\

It seriously doesn't get any easier than that, and I can't get over how good this is. I added the chicken to make it a more filling meal than just a salad, but it's absolutely not necessary. And I can't help thinking how easy it would be to adapt--tomatoes are out of season now? People are eating squashes? I can add some squash, okay. Cool. The best part? You're serving four people for under $10. If you buy things on sale, it's a lot under $10.

Of course I'm going to tell you again to go buy that cookbook, but also don't forget to check out her blog. It is just as lovable!

And speaking of blog love, you should also go check out Pixie's most recent post. She loved my blog so much that it inspired her to start documenting her food! I'm so flattered! And I must say her stuffed chicken breasts look delicious; she seems to have the "presentation" thing down much better than I do, too.

Friday, August 13, 2010

We're still not sure who killed Amanda Palmer, but I put her into a food coma and that's pretty awesome.

Hi guys! I promise there's food in here, but I have to be a fangirl for a moment. You'll probably learn more about me than you could from all the rest of my posts combined here. If you don't want to hear about me (or, well, about Amanda Palmer, really) you can scroll down to the recipe.

Today I'm going to take you into a fantasy world that is very much like the real world that you live in right now, except that you're me a few weeks ago.

There's a lot of music that I listen to, a lot of art that I look at, a lot of books and comics that I read. I'm not going to say these things that I do are the best things, but they're usually the things I love (okay, except for the music, my car doesn't have a CD player so I'm usually stuck listening to whatever's on the radio). With all the media that we have such easy access to these days, it's easy to not think about it most of the time--but I bet you all have someone, an artist, writer, musician, something, that really makes you think or care or push yourself or whatever. Think for a bit and I bet you'll come up with someone--a song that changed you, a poem that you memorized in grade school and never forgot, a book that suddenly made your mind click in the right way so that you're looking at the world in a way that makes sense to you now.

Now imagine that there's a thing that you do. Something that you do and know you're doing well and people love and appreciate--in my case, food. And that person who changed everything has a blog, and they write in their blog about a show that they're doing that--wow, is only about an hour away, that's not a bad drive at all. And there are rehearsals, and there are a lot of people, and the rehearsals are long, and they need to eat. And that person--your person--needs people to do your thing and bring it there. Amanda Palmer needed people to bring food to Cabaret rehearsals in Cambridge. My person. My thing. I couldn't not do it.

Most of the time when I mention her to people, I get a weird look and a confused "who?" in response, so for those of you giving me that look right now, she is a musical artist and force of nature. (I say "musical artist" because I really feel that in this case "musician" doesn't cover it.) Now, I didn't know anything about Amanda Palmer a year ago. I'd be giving you the same look that you're giving me right now if I were on the other end of this conversation, but that changed drastically in a very short period of time.

I don't know exactly how to describe Amanda's music. I think she files it as "punk cabaret," which may not make sense if you're not familiar with it, but I promise it fits. What I can say about it is that when I was introduced to her solo CD "Who Killed Amanda Palmer" (there's a book now, too) I was in a really bad place that I needed to get out of. I'm not going to describe it in depth--there was some depression, some anxiety, some trauma--I was broken. I'm not going to give Amanda all the credit here (I cannot express my gratitude to Mike for being there and talking me through things or just holding me when I break down in the middle of the night and he has to be at work at 6am--he has been my rock and he doesn't understand how much he's done). But when Mike's not around, or when I need to be alone, I listen to her music. And it was listening to her music that started making my brain tick the right way again, that pushed me to go beyond just crying to Mike and heal myself. It's not quite "empowerment," there's more to it than that, but I can't express it. And then at some point, she freed herself from her record company, and to celebrate she posted a free song for her fans. I listened to it and I cried and I laughed and I suddenly knew that despite everything, I was going to be okay. So that's what Amanda Palmer means to me. What she creates helped me find my own strength that I know was there all along, but not quite within reach, and jump up and grab it and hold on to it. At some later point, I started feeling depressed again, and with that strength that I'd found I was able to fight it off by myself without running back to antidepressants or just being miserable, and it felt great to be able to do that. Amanda, if you're reading this, thank you so much for doing what you do.

It's not like I'm completely better now. Honestly, people terrify me. I've always been shy around people I don't know, but for some reason in the past few years I get scared to go to parties. Social anxiety isn't fun at all. Mine's bad enough that, when Amanda made that blog post about wanting people to bring food, I was almost too scared to send an email about it. But I did, and I worked things out, and I thought about food and what kind of food vegetarians and vegans and people who can't eat rice-based products and carnivores all love, and I made a whole lot of falafel and I went to that rehearsal and fed the cast of Cabaret, including Amanda Fucking Palmer. (I hope people here aren't offended by swears, but I'm pretty sure that if you write a lot about her you have to include that. It may or may not actually be her legal middle name. Okay, it's not, but her lawyers apparently actually thought it was, and it belongs there. I can't censor her.)

Okay, okay, I'm getting to the food. Here. Sorry. I didn't turn into a burbling puddle of fangirl when I met her, so I kind of had to here, just because I needed to get it out. (I doubt it would even be possible to turn into a burbling puddle of fangirl around her--she's so down to earth and so real [in the sense that I usually expect people who are even remotely famous to have some manufactured personality]). She's an incredible person to hang out with. She asked me about me, and we talked about how cool it is that the internet lets people who are artists make a living off their art without "making it big" and how cool that is, and about food comas and crazy schedules, and I told her about how I sort of want to be her fiance when I grow up (oh, right, she's engaged to Neil Gaiman, if you didn't know that--somehow it seems right that my two favorite famous people/biggest influences are going to get married).


FOOD STARTS HERE.
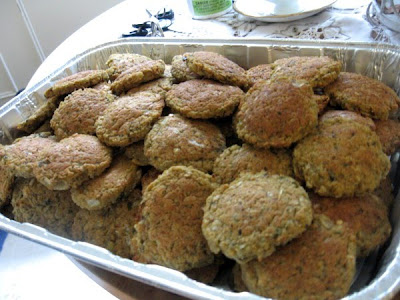
You may have noticed up there that I said I made a whole lot of falafel. I'm posting the recipe, of course. I was asked for it. I'd be posting it anyway, but that seems important. I made double-batches of this recipe, and I made three double-batches, so essentially six of these. It was a lot of food. It was stressful for a couple minutes when I wasn't sure they were going to finish in time for me to put on real clothes and pack things up and drive to Cambridge. I'm going to tell you right off the bat not to make double-batches of this unless you have a HUGE food processor--it was quite difficult to integrate everything at times and required a lot of "pulse, stop, push stuff around with a spoon, put the cover back on, pulse again, repeat." If you don't have a food processor, that's totally okay too! It'll take a lot longer, but you can dice everything really small and fork-crush the garbanzo beans into it. And the best part of this recipe is that it's baked instead of deep-fried--no greasy oil making it heavy in your stomach and it's SO much healthier. YES.

RECIPE: Baked Falafel
Adapted from ChowVegan

Ingredients:
-1 15-oz can garbanzo beans (chickpeas)
-1 small onion (or large shallot), chopped
-2 or 3 cloves of garlic
-1 tbsp fresh parsley
-1 tbsp fresh cilantro
-1 tsp lemon juice
-1 tsp coriander
-1 tsp cumin
-1/4 tsp dried red pepper flakes (double for spicier falafels) (yes I know it doesn't pluralize like that just work with me here)
-2 tbsp flour
-1 tsp baking powder
-IF YOU'RE FORK CRUSHING: 1 tsp olive oil (adding this in the food processor will make it come out very liquid)

Instructions:
1. Drain and rinse the garbanzo beans. Leave them in a colander in the sink until you use them so they drain adequately; you don't want to add too much extra liquid here.
2. Slice the onions, peel the garlic, and throw them both into the food processor along with the parsley and cilantro. Pulse until everything is finely minced; it will sort of look like a coarse crushed ice type of dessert.
3. Pour in the garbanzo beans and everything else (coriander, cumin, lemon juice, red pepper flakes, flour, baking powder). Using a wooden spoon, try to stir the mixture enough to get the garbanzo beans at least slightly integrated with the onion mixture--this will probably be a lot easier in single batches than it was in double batches.
4. Turn on your food processor and let it do its thing, stopping frequently to mix things around and make sure it's fairly evenly textured. It won't be perfect, but if you don't do this you'll end up with hummus at the bottom and mostly-whole-garbanzos at the top. Be careful not to let it go too long, or you'll just end up with hummus.
5. Heat your oven to 375 degrees (F). Take out and oil some cookie sheets. Roll the falafel into balls and press them to make patties, placing on the cookie sheets. They don't spread like cookies, so you can put them pretty close together, but keep in mind that you do have to flip them halfway through baking so if they're too close that gets difficult.
6. Bake your falafel for thirty minutes, taking it out and flipping them over halfway through.
7. When your falafel is done, let it cool for a few minutes, then serve in a pita with lettuce, sliced tomatoes, and tahini sauce. (Adding hummus is a common practice, but it's one that I don't understand since falafel is pretty much hummus that's been processed for a shorter time and then cooked. If you want hummus, you can add it.)

The tahini sauce recipe that I used was perfect and can be found here. I followed it to the letter, so there's not much point in my typing it up again (it's late and I'm sort of tired).

Step 2. If you're using a food processor, slicing things like this works--if you fork-crush the garbanzo beans, mince everything really really tiny. (Instructions for fork-crushing are at Chow Vegan, linked above.)

Step 2, continued. This is just the above stuff after being processed for a few seconds, but it looks so fresh and delicious that I had to take a picture. I don't know why it looks so dessert-like to me.

Step 3. Everything else, added.

Step 4. If you look closely, you might notice a whole garbanzo bean or two. That's okay--I just crushed them with the spoon as I came across them. It's better to have more texture than to turn your falafel into hummus--can you see on the right how it sort of already looks like hummus on the bottom?

Step 5. This was a little closer than they should be, but like I said, only because it was difficult to flip them.

This was a lot of falafel.

It got eaten, though!

By Amanda Palmer! (Sorry I'm pointing at your boob, Amanda. I was trying to point at the sandwich to say "I made that!" but I guess I couldn't really tell where the sandwich was.) Are you familiar with The Princess Bride? You know that part where Buttercup kisses the King because "he's always been so kind to her, and she's killing herself once they reach the honeymoon suite" but he's too excited that she kissed him to process what she said and just says "Isn't that nice. SHE KISSED ME!" Well, that's sort of what it was like, except Amanda wasn't planning on killing herself or anything. It was just sort of awesome and surreal, so despite the fact that I'm all scrunched up and the camera added like 50 pounds to me (that's a lie, maybe 10) it's my favorite picture ever. (Photo credit to someone in the cast who took the picture with my camera. I'm terrible with names so I can't tell you who.)

And, of course, the rest of a hungry cast, all of whom were SUPER COOL. (Photo credit to Amanda's phone, I'm not actually sure who took the picture. Someone in the cast. Amanda posted in on twitter.)

And then Amanda went into a food coma power nap and told me it wasn't creepy if I took a picture as long as I promised it was sexy. I think this is a pretty sexy nap picture, don't you?

OKAY I'm pretty exhausted now because it's been a busy few days and is going to continue to be a busy few days, so I'm gonna leave you with that. And I'll probably come back and edit this post to add some appropriate links tomorrow. And I know I said I'd post Friday and it's technically Saturday, but I'm still awake so to me it's still Friday. ALSO THIS IS VERY IMPORTANT: since it's technically Saturday, it's now officially Mike's birthday! Wish him a happy birthday in the comments, he totally deserves it. HAPPY BIRTHDAY MIKE I LOVE YOU.

Oh, one more thing. If you're anywhere in the Boston area--actually, within four hours of the Boston area, go see Cabaret. I saw a little bit of rehearsal and it was amazing. I can't wait. Buy tickets here.

Saturday, July 3, 2010

Sausage Stir-Fry with a side of Nostalgia

One thing that frustrates me as a person who likes to cook is the barrage of questions that I frequently have to face when feeding new people. "Where did you learn to cook?" "Where did you get this recipe?" Sometimes it isn't questions so much as assumptions--"Wow, your mom did a great job teaching you to cook!" The questions and assumptions on their own wouldn't be all that bad, but people always seem so disappointed in my responses. I learned to cook from reading cookbooks and following the directions. When I didn't know what something meant, I looked it up. More recently, I've expanded my skills using online tools (such as other blogs or sites like Recipezaar). Chances are, I found the recipe online; I think I have a total of two "old family recipes" that I can toss together from memory in my repertoire.

My point here is that, no, my mom didn't teach me how to cook, and I don't think that's a bad thing as so many people seem to. Why is it that everyone always seems disappointed when I say I got a recipe online, or that I taught myself with the help of numerous cookbooks and weeks of my life staring at the computer screen? My mom isn't a bad cook (though she would probably tell you otherwise)--I quite like her cooking, and when she does cook I think it's excellent, but she doesn't love it like I do. We never spent time in the kitchen when I was little with her showing me exactly how she makes a pie crust, and I think it's okay that I found out from a book.

However, the passion and interest must have come from somewhere, and that credit goes to my dad. He never really taught me a recipe, because I'm not sure if he ever really followed a recipe, but I do remember him busy making something for dinner and asking me if I could pit the olives, which was my favorite job because I ate most of them. (I got yelled at for this. Sorry, Dad.) He would chop up peppers for a stir fry and give me slices so that I could learn how much sweeter red peppers are than green peppers. There were nights that my mom and brother and I searched the refrigerator and cabinets and pantry for something to make for dinner, finding an old tomato, some peanut butter, three or four gallons of milk, huge jars of spices, and nothing else. Somehow, on these nights when there was nothing in the house and we were all too lazy to go grocery shopping, my dad could come home and whip up some simple, excellent meal out of our total lack of ingredients.

I never learned to be quite that resourceful, unfortunately--I either plan a meal out and go to the store and get everything I need, or I don't plan a meal and I go to the store wandering around until I find something that inspires me. I also never learned the knife skills that my dad tried to teach me; they're getting slightly better than they used to be but it still takes me at least 6 minutes to chop up a pepper. (I'm getting good at carrots, celery and rhubarb, though.)

So...nobody really taught me how to cook, and I find my recipes wherever I feel like, but I think my dad taught me how to play with my food and enjoy my time in the kitchen. He taught me to triple the garlic in any recipe I read and to like pepper far more than is perhaps healthy. And, without him, I never would have learned to buy twice as many olives as I planned to put in a dish. This recipe is based on one of those things that he used to come home and throw together, leaving the rest of us wondering where the ingredients came from but in the end quite satisfied with our meals. It's quick, simple, and delicious.

RECIPE: Sausage and Pepper Stir-Fry

Ingredients:
-1 package of sweet Italian sausages (usually contains 5 or 6) (If you'd like, use half a package of sweet and half a package of hot for some more variety--freeze the rest!)
-1 or 2 green peppers
-1 or 2 red peppers
-2 tomatoes
-1 large onion
-a whole lot of garlic
-some cooked pasta (homemade if possible!)
-ground pepper (or whole pepper in a grinder) (I like to use peppercorn medleys instead of just plain black pepper, but I don't really know what the difference is, so use whichever you prefer)
-extra virgin olive oil
-freshly grated romano or parmesan cheese

Instructions:
1. Heat some olive oil in a large frying pan. Once it's hot (a drop of water sizzles and evaporates immediately), add the sausages whole. Fry on each side for a few minutes, until lightly browned and partially cooked through. When you're not tending to the sausages, chop the peppers and onion (and, of course, garlic).
2. Remove the sausages from the pan and slice them into medallions. (If you don't fry them whole first, they won't slice properly and you'll get sausage-balls with little strips of sausage casing, and you don't want that.) Return to the frying pan. Lay as many flat as possible.
3. Fry the sausages until cooked through, flipping occasionally. Once they're done (or mostly done, since they'll still be in the pan) add the peppers, onion and garlic. Sauté until slightly softened, but still crisp enough to crunch a little when you bite it--you don't want soggy vegetables.
4. While the peppers and onions are softening, chop the tomato. Once everything else is done, add the tomato and a a few grinds of pepper, stir, and cook until the tomatoes are hot.
5. Serve over a bed of pasta with a generous amount of cheese to top each dish. Make sure to get some of the juices from the pan onto your plate--they're excellent!

Tasty sausages!

Yum! Mike and I use a ton of vegetables when we stir-fry--that's a BIG pan full of them. We usually end up thinking that we should have used less, but we never do the next time, and we fill up on healthy food and don't have room for ice cream. (Which is really sad--there's key lime and graham cracker gelato in the freezer that we keep being too full to eat.)

That looks like a ton of food, but it's mostly a pile of vegetables. We used leftover homemade whole wheat noodles, which wasn't true to my childhood memories at all but they were perfect with this dish.

I was originally going to post this on Father's Day, but then I had to go to my cousin's graduation party, and then I forgot about it, and then I realized that I never really posted anything for Mother's Day and I didn't know if it was okay to post something for Father's Day and not Mother's Day, and THEN I figured, well, my dad was always the cook, so it makes more sense, and I also gave my mom an awesome scarf and baked her a pie. So, consider this a very belated Father's Day post. (I think he also deserves credit for my tendency to cook with peppers, tomatoes and onions.)

How about you guys? Did you teach yourselves to cook, or did you have a parent or grandparent to show you the ropes? Any family recipes?

I hope everyone (well, everyone in the US) has a great 4th of July tomorrow--we're going to my family's annual grilled-meat-fest (seriously: sausages, steak tips, burgers, hot dogs, grilled chicken, and it's all too good to pass up--I think I'll skip breakfast).
Sausage on Foodista

Tuesday, June 29, 2010

pesto 3-in-1

This is another favorite that I discovered on Recipezaar ages ago, "ages" here being defined as "7 or 8 months." It's easy and delicious and I have a bunch of basil plants now because I want to make pesto out of basil I grew myself. This is ambitious and may never happen, but I remain hopeful.

You can buy pesto to make this, but I much prefer to buy a bunch of basil and pine nuts and romano and garlic and olive oil and make it myself. It keeps for about a week in the fridge if you seal it, or you can freeze it in ice cube trays and have little single-portion cubes of frozen pesto to melt whenever you feel is appropriate.

RECIPE: Basic Basil Pesto

Ingredients:
-about 4 cups loosely-packed basil leaves
-about 1/4 cup freshly grated parmesan or romano cheese
-about 1/3 cup pine nuts
-3 or 4 cloves of garlic
-about 1/4 cup extra virgin olive oil

Instructions:
1. Put everything in a blender or food processor and puree. If it's too dry, add small amounts of olive oil until you achieve your desired consistency.

Ooh, yeah--make sure to wash the basil first! I try to avoid including any stems. I'm not sure what the normal protocol on stems is.

You may find it easier to blend the basil before adding everything else, especially if you're using a blender. I used my mini-food processor and did the basil in small batches before putting everything else in the blender, but my blender is pretty lame and doesn't work so you'd probably be fine just putting everything in at once.
Once it's done, put it in a container and refrigerate until you're ready to use it! I love the bright green of a fresh pesto--you don't get that from the jarred varieties.

Okay, so that was pretty much the easiest thing ever, right? If you have the basil, it's absolutely worth it, but basil can get pretty expensive so you might want to skip the 'making pesto' step and buy pesto instead to make this chicken. Because it's SO GOOD. I call it "caprese chicken" because, well, it's tomatoes, basil and mozzarella, but I think "pesto chicken" works just as well.

RECIPE: Caprese Chicken
Ingredients:
-6 thin-sliced chicken breasts
-3 plum tomatoes
-pesto (above)
-a ball of fresh mozzarella (or a bunch of the tiny ones)

Instructions:
1. Pre-heat the oven to 400 degrees F. Wash the chicken and trim any excess fat off the edges.
2. Slather the pesto all over each chicken breast and place on a foil-lined baking sheet.
3. Place chicken in the oven for 15 minutes. Meanwhile, slice the tomatoes and grate (or slice) the mozzarella.
4. After 15 minutes, remove the chicken from the oven. Lay slices of tomato on chicken and coat with mozzarella. Return to oven for 3-5 minutes, until cheese has melted.
5. Remove from oven. Serve on a bed of pasta (with pesto!) and with some vegetables. Enjoy.

I scoop some pesto into a bowl and cover about 2 thin chicken breasts with it, then add more. This isn't properly coated--it's just to point out that this recipe does get quite messy at times.

Apparently I didn't get a good picture of how the chicken looked once it was thoroughly coated, and you shouldn't go by this because it looks less coated once it's baked. This is the 'slices of mini mozzarella' version.

The chicken comes out juicy and flavorful. I love trying to get everything in one bite--the chicken, pasta, tomato and cheese. I also tend to always serve this with asparagus, but that's just because I love asparagus!

Okay, so you can clearly see that I made 7 chicken breasts, even though I said 6. The package came with a different amount than usual. The thing here is to make a lot of leftovers--I was serving two people with this, but everything left goes to good use: it makes the best sandwiches ever! Which I'm ALSO going to tell you how to make! (In addition, the sandwiches are why I use thin-sliced breasts. If you don't care to make sandwiches, then you can use thicker breasts if you'd like, but I think this provides an awesome ratio of pesto to chicken.)

To make the sandwich, take your favorite kind of bread--I highly recommend rye in this situation, but your tastes may be different--and slather some of your remaining pesto on each slice, the same way you did the chicken in the first place. Grate some leftover mozzarella onto one side. Heat the leftover chicken, then put it on the inside, wrap in tinfoil, and toast (I use the 'dark toast' setting). Or, if you have a panini press, this would be a great time to bust it out! I, sadly, don't. These are excellent, sandwich-shop quality sandwiches that you make at home with leftovers from a really simple dinner.
Like this.

Holy blurry picture, Batman. Sometimes there's nothing I can do to stabilize my camera. But you can still see this, and just look at all the delicious layers in there. The pesto gives the sandwich a super creamy texture inside, and the bread is nice and toasty.

So, there you have it: how to make pesto, what to do with it once you've made it, and what to do with the leftovers. Now I'm starving! I wish I still had some left.

I also can't help but wonder how this chicken would fare on the grill--has anyone grilled pesto before? Does it work? (Maybe I'll try it and let you know.)

Tuesday, June 15, 2010

Black Bean Salad

During the summer, I really like having a salad as a side dish, or even as a light meal. Unfortunately, actual "salad"--that is, the lettuce part--makes me really sick. I miss things like Chicken Caesar Salad, and occasionally I'll decide that it's worth feeling sick afterward and eat lettuce, but I've managed to find a few excellent lettuce-free salads to enjoy in the warmer weather.

I first had this delicious black bean salad about....wow, six or seven years ago. My aunt Janny made it when we were visiting. My cousin Julia always used to whine when she made recipes from the Cooking Light magazine ("Is this from COOKING LIGHT?!"); I haven't tried many other Cooking Light recipes, but I imagine that while they're probably delicious to many adults, the palate of a 10-year-old requires more butter, sugar, hamburgers, etc. However, I'm pretty sure Julia didn't complain about this. My mom got the recipe. It's been something I look forward to in the summer every year since then, and though we use the original recipe as a reference we never quite follow it exactly so it's never exactly the same twice. I think that's okay.

I make this in bulk. It still never lasts more than three days in our fridge. My mom and I basically eat it as or with every meal until it's gone, and I'm usually immediately wondering when I should make it again. I made it probably about a week ago (a little bit more) and I think it's time to make more. It's just that delicious. So, without further ado...


RECIPE: Black Bean Salad
Adapted from Cooking Light

Ingredients:
-3 15-oz cans black beans
-A handful of fresh cilantro
-A few sprigs of fresh parsley (2-3 tablespoons, probably?)
-3-or-so green onions
-Juice from one lime
-3 large on-the-vine tomatoes (they'll be medium sized tomatoes, but large for on the vine tomatoes.)
-2 ripe avocados


Instructions:
1. Open, rinse and drain the black beans. I leave them in the colander while I chop everything else up so that they drain better. You could put them in a large bowl immediately if you want.
2. Mince the cilantro, parsley and green onions. Put them in a large bowl.
3. Cut the lime into quarters. Squeeze as much juice from you can out of each wedge into the large bowl.
4. Cut the tomatoes in half and scoop out the seeds (sometimes this is much easier if you cut the tomatoes into quarters). Chop them into small pieces, about a centimeter square (fingernail-sized?) and add them to the large bowl.
5. Cut the avocados in half and scoop out the pits. I find it easiest to cut them by leaving them in the peel and using a butter knife to cut cut a grid into the flesh, then scoop that out with a spoon. I usually cut about four lines up and down and probably six sideways for a good-sized "diced" avocado. You could also extract the flesh from the peel and cut there. (By the way, those little avocado tools that do this for you? I think they're pretty useless. You can do it by hand just as easily, and washing a butter knife is a lot easier.) Okay, so add the diced avocados to the bowl.
6. If you didn't put the black beans in the bowl at the beginning, add them now. Stir (gently, so as not to crush the avocado) with a wooden spatula until everything is evenly mixed together.
7. Refrigerate for 1-2 hours (longer is okay) before serving. (You don't technically have to do this, but I always think it comes out better if you do. Somehow the flavors combine during this time.)

Mike hates avocado, and he loved this. (I was glad he did; I would hate to make something he didn't like. I haven't so far.) It tastes super fresh and summery (I think that's the cilantro; for some reason it seems like it's definitely a summer herb) and all the flavors in it combine perfectly. You can serve it over lettuce or as-is. I haven't yet fed this to someone who didn't like it, so try it out, and try not to get too addicted.

Saturday, May 29, 2010

"You have a pasty at Mabel's for me, you hear?"

For those of you who aren't on Twitter, for the first time, I think I can sincerely say that you're missing out. There's a new phenomenon called "One Book One Twitter" (or #1b1t) where, during the summer, everyone on Twitter has the option to participate in a twitter-wide book club. It's not exclusive, there's a schedule but you can read at your own pace if you want to, and this year--the FIRST year--one of my all-time favorite books was selected: American Gods by Neil Gaiman. The coolest part of this is that Gaiman uses twitter himself, so occasionally he does an hour of "Ask Neil" and he'll answer anyone's questions, which is AWESOME. If you're not familiar with Gaiman's work and don't mind a little fantasy, surrealism and existentialism in your literature, check out his books--he is a master of the English language. His books pull you in and immerse you in a surreal adventure, pressing you to question the world around you and the validity of pretty much everything. At least, that's how I feel.

I just finished reading this morning, but according to the schedule, this week everyone's on chapters 9-11, in which the main character discovers a delicious meal at a local diner-type restaurant called Mabel's.

"Breakfast for me," said Shadow. "What's good?"
"Everything's good," said Mabel. "I make it But this is the farthest south and east of the yoopie you can get pasites, and they are particularly good. Warm and filling too. My specialty."
Shadow had no idea what a pasty was, but he said that would be fine, and in a few moments Mabel returned with a plate with what looked like a folded-over pie on it. The lower half was wrapped in a paper napkin. Shadow picked it up with the napkin and bit into it: it was warm and filled with meat, potatoes, carrots, onions. "First pasty I've ever had," he said. "It's real good."
-American Gods, p. 266-267 in my edition (chapter 10)

Now, in honor of One Book One Twitter, and because I've read American Gods a million times and always wanted to try these out, I of course searched for a recipe and made them and they are, just as Gaiman says, "a savory delight wrapped in a hot pastry." Ideally, for this recipe, you have minced beef. I didn't have minced beef, nor did I have the patience to mince my own beef, so I used ground beef instead--but if you can get your hands on some good minced beef, then do.

RECIPE: Pasties
Adapted from Recipezaar
Ingredients:
-1 lb minced (or ground) beef
-1 tbsp olive oil
-2 white onions
-3 cloves garlic
-1 15-oz can whole tomatoes
-1 tbsp tomato paste
-1/2 lb carrots
-1 tbsp soy sauce
-1/2 pint beef stock (from bullion cubes)
-1 lb white potato
-a splash of milk
-2 tbsp butter
-a dollop of Worcestershire sauce (I didn't really measure out my additions, so add stuff until it tastes good!)
-Herbs and seasonings (I used marjoram, tarragon, basil, oregano, a little bit of italian seasoning, cinnamon, cumin and cocoa--yeah, it's a lot, but it was tasty. Use your discretion here.)
-pie crust or puff pastry*
-1 egg

Instructions:
0: Cut everything up ('everything' being defined as potatoes, onions, and carrots).
1. Using the potatoes, milk, and butter, make some mashed potatoes. Don't whip them--leave plenty of chunks of potato. Alternatively, you could just boil the potatoes and cut them up into very small pieces--I think this would be the more authentic way to do it.
2. In a very large frying pan or wok, heat the oil and sauté the onion until it softens. Move the onion into a bowl.
3. Add the beef to the frying pan with a little more oil if necessary. Stir constantly as it browns to ensure that all the clumps are broken up (not sure if this is a problem with minced beef but ground beef, especially the leaner varieties, is very sticky).
4. Once the beef is fully cooked, add the canned tomatoes (break them up as you stir them), carrots, soy sauce, tomato paste, Worcestershire sauce and some herbs. (You'll be adding more herbs to taste as it cooks, so don't overdo it here.)
5. Add the beef stock and allow to simmer for a few minutes, then add the onions and potatoes. Stir thoroughly and simmer until it's not really liquid anymore (about 20 minutes?) and you'll be able to scoop it out and it will stay in a lump instead of spreading into a big mess. You want it to have the consistency of slightly watery mashed potatoes. As it's simmering, taste it occasionally and add more seasoning as desired.
6. NOW IS TIME TO PREHEAT THE OVEN! Preheat the oven to 425 degrees F, 220 C. Then prepare the pie crusts: I traced a small plate (7-8 inches) in each rolled-out crust with a knife so that I had 7-8 inch discs of crust to fill.
7. Lay a crust circle on a cookie sheet. Scoop about a cup of the beef mixture (or as much as it seems will fit into the crust when you fold it over, though I overshot a few times and had difficulty folding the crust over) onto one side of the pie crust, then fold the other side over and press all around it to seal it. Continue doing this with each crust circle. (You'll probably fit 2-3 on a cookie sheet.)
8. In a small bowl, beat the egg. Using a pastry brush, brush the beaten egg over each of the pasties. Put them in the oven and bake for 25-30 minutes until golden and shiny.
9. When you remove them from the oven, allow them to cool a bit before eating them--the inside will scald your mouth if you bite into it immediately. After about 10 minutes, they'll still be nice and hot but more edible and you can enjoy your creation!

Step 4.5: after the beef stock is added, before the potatoes and onions.


Once everything was added and simmered down completely. (Actually, this is what we had leftover after filling the crusts--I'd forgotten to photograph it first! But the picture is still accurate.)


Right out of the oven--they looked so pretty! I was quite happy with myself, despite the holes.


Despite the fact that Shadow eats his with his hands, I thought a fork would be more appropriate--I was worried about them falling apart and making a huge mess if I picked them up. Plus, this way I could blow on each forkful to cool it a little more.


Yet again, Mike made a "special" one for himself. He covered it in cinnamon sugar before I put them in the oven. It stuck to the pan more than the others (probably because of the burnt sugar) and therefore fell apart more, but he said it was delicious nonetheless. (Then again, Mike does weird things with food. He just ate a bowl of cereal with coffee grounds on top. So I don't necessarily trust his judgement.)

I doubled this recipe so I'd have plenty to freeze (and because my brother was home and his friends might be around) and ended up with 10 pasties and some leftover filling (also in the freezer, so I can whip up some pie crust and make more). The amount you end up with will depend on the size of your pies and how full you want them.

I expected these to be super filling and heavy--one of those "okay maybe I shouldn't have eaten that whole thing" foods. Surprisingly, they were the perfect amount of food: we were all full, but not completely stuffed. And, if you think about it, each one only has a little bit of meat, a tiny bit of mashed potato, some carrots, etc--it's a pretty well-rounded food! I can't wait to play with this concept a bit more and always have some delicious meal-in-a-pie-crust frozen for emergencies (or nights that I just don't feel like cooking).


*I used my normal pie crust recipe and it came out wonderfully, but it is a post in and of itself--I'll have my pie crust up here soon, keep an eye out for it! **EDIT: Pie crust recipe is up and linked to!**

Sunday, May 23, 2010

SAUCE ADVENTURE!

Remember way back when I wrote about my pasta adventure? You probably don't, since that was only my second post and I have a lot more followers now! Welcome to those of you I don't know, it's so great to know people are reading my blog! Anyway, at some point in that post I mentioned that maybe eventually Mike would let me document/blog about his sauce recipe, and today is that day! (Well, documented a while ago, finally had the time to resize all the pictures and post today.) I apologize in advance for the picture-heavy post: this sauce takes five hours to cook and has a lot of steps! It's a family recipe passed down from his great grandmother, who moved here from Italy, so he likes to think it's pretty authentic but we don't know for sure. (I'm pretty sure my Italian professor told us that spaghetti and meatballs is an American thing.)

Okay! Since this is so picture-heavy, I'm going to try to ease off the irrelevant writing and stick to the recipe. It's sort of complicated, so bear with me.

RECIPE: Five Hour, Multi-Meat Pasta Sauce

Ingredients:
-2-3 medium white or yellow onions
-1 whole bulb of garlic
-A tablespoon or two of extra virgin olive oil
-1 6oz can tomato paste
-1 8oz can tomato sauce
-1 29oz can tomato puree (We highly recommend using Contadina for all of these.)
-1 package sweet Italian sausage (5 or 6 sausages, not one of those giant packages) (You could use hot Italian sausage if you wanted to. We wouldn't be upset. Mike just isn't a fan of spicy. You could also use one of those herb-y or garlic-y sausages. Seriously. It's up to you.)
-1 lb lean ground beef or buffalo (surprisingly buffalo is available in most grocery stores and doesn't really cost all that much!)
-1 cup Italian-seasoned breadcrumbs (we haven't gotten quite ambitious enough to make our own yet, but if you want to, by all means go for it--just add some Italian seasoning!)
-1 cup finely grated Romano cheese (Parmesan would work just as well; we use Romano because Mike prefers it)
-1 egg
-Copious amounts of Basil, Italian seasoning, and Rosemary
-Frozen leftover pieces of steak and/or pork chops and/or chicken (make sure it's all boneless)

Special Equipment
-8-quart stockpot (6 would work, but you'd have to let everything simmer down for a few hours before adding the meat so it doesn't overflow, and having all the meat in the whole time makes it more awesome)
-A roasting pan with a wire rack that allows grease to drip under the meatballs instead of letting them absorb it (I mean, you could probably use a cookie sheet if you wanted, but this is healthier and they cook more evenly)
-A tiny rubber spatula that will fit into the tomato paste can

Instructions
1. Preheat the oven to 350 degrees (don't forget to do this first because forming the meatballs doesn't take very long).
2. In a large bowl, combine the ground beef/buffalo, breadcrumbs, grated cheese and egg. Mix thoroughly. Divide and form into about 12 balls, or whatever amount of balls you think makes a good size. We like this size.
3. Spray the roasting pan (with wire rack in it) with cooking spray (Pam makes an olive oil spray that I prefer over most others) and place the meatballs on top of the wire rack, evenly spaced. Put the meatballs in the oven and bake for 1 hour.
4. Peel and chop the onions and garlic (yes, the whole bulb) and put them in the stockpot with a few tablespoons of olive oil. Turn the heat on medium-high and sauté until the onions become clear and soft.
5. Ideally at this point the meatballs have been in the oven for about half an hour.
6. Add the tomato paste, sauce and puree. Make sure to get all the tomato-y goodness out of the cans! (This is why you have the tiny rubber spatula.) Fill the tomato puree can (the largest one) with water and pour it into the stockpot. Repeat two more times so you have three cans of water in there.
7. Grab your seasonings. Sprinkle enough basil on top of the sauce to cover the entire surface, then stir it in. Repeat with italian seasoning, then cover only half the top with rosemary. (This was the first time we'd used rosemary, so we didn't want to add too much, especially considering it's a fairly strong herb. Mike couldn't really taste the amount that we put in, I could detect a hint--next time we'll probably coat completely like with the other spices.)
8. Stirring frequently, bring the mixture to a soft boil, then reduce heat so that it reaches a low simmer. Put the lid on the pot slightly ajar.
9. Put the sausages in a medium frying pan and put enough water in with them such that the sausages are about 2/3 submerged. Stab them all over with a knife. TRUST ME. (See picture for explanation.) Put on medium heat. Flipping the sausages occasionally, allow the water to boil off completely, then increase the heat and brown the sausages on both sides. Turn off the heat.
10. When the sauce has been simmering for half an hour, add the sausages, meatballs (which, ideally, have just come out of the oven) and any frozen leftover meats that you have (we had two small steaks and two pork chops). TIP: If you enjoy making sauce, make and save leftovers. If you're cooking for two, make three steaks/pork chops/chicken breasts, toss them in plastic bags, and toss those in the freezer. Label them if you think you'll be confused. They are excellent in the sauce and that way, if you want them, you don't have to cook them while you're also doing everything else--they're ready to just drop in.
11. Stir. Let the sauce continue to simmer, stirring at least every half hour. When you're not stirring it, keep the lid ajar.
12. When the sauce has been simmering for about two and a half hours, get the herbs out again. Sprinkle the basil and Italian seasoning over the top just as you did before (so that it covers the surface), and the rosemary again to cover half of it (and next time we make sauce, we'll know whether we should completely cover with rosemary both times, but for now I'd say stick with half). Stir, cover (ajar) and resume stirring every half hour. (If you're making fresh pasta or gnocchi, this is a good time to start it!)
13. When the sauce has been simmering for five hours, it should be reduced to the perfect consistency (if you like a really thick sauce, though, you might want to simmer it a little more). Taste the sauce--it's probably pretty acidic. If it is, add a tablespoon or two of butter (I think we used two) to reduce the acidity (so you don't end up with awful heartburn after eating the sauce because that would be bad). Once the butter is melted and stirred in, the sauce is ready to eat!

Step 2! This seems to be a good size for the meatballs. And also this is what I mean about the roasting pan.

Step 4: It looks like so much garlic, but we couldn't really taste it--next time we'll probably add two (possibly three) bulbs, and throw it in halfway through the simmering with the second round of spices, instead of at the beginning. That might give it a stronger garlic-y taste. (This was the first time we'd added garlic, though--we're learning!)


Also step 4: the onions and garlic (and olive oil) ready to start. Yay!


Step 6: after adding all the cans of tomato, but before adding the water. It can be hard to incorporate the tomato paste well!


Step 7: Now you've added the water and the seasoning and your entire house should start to smell REALLY GOOD.


Step 9: I was so skeptical when Mike first showed me how to do this and he boiled the sausages, but it gets a lot of the unnecessary fat out of them--just make sure to prick them in a bunch of places with a knife. Otherwise they develop large pockets of grease and you stab them and they sort of explode and you're covered in hot grease. NOT COOL.


Also step 9: When they look roughly like this, they're done and ready to go in the sauce.


Step 10(ish): meatballs right out of the oven. If you can tell me why the meatballs are nice and round and pretty when they go into the oven and come out all deformed like this, you'll win a prize. (Not a good prize. Probably just gratitude and the knowledge that I'm slightly less confused. But I'm calling it a prize. Maybe that guy who does the show about food and science on the food network should answer this for me.)


Also step 10: Mike drops a little frozen steak into the sauce.


Step 13: yay butter!

This time, we had the sauce with freshly made whole wheat pasta. I always hated whole wheat pasta when I was a kid because the texture was too grainy, but when you make it yourself it comes out way better. That could, however, be due to the fact that I used half whole wheat flour and half pasta flour. To replicate this pasta (which was delicious and will probably be how I make pasta from now on), combine two cups whole wheat flour and two cups of pasta flour. Make a mound with a dip in the middle like a volcano and put four eggs into the hole. Stir the eggs, slowly incorporating more and more flour. When you're out of egg and need to get the rest of the flour in, add a little bit of water at a time. An important thing to keep in mind is that the whole wheat for some reason becomes a stickier dough, so when you're rolling it out later you'll want to keep flouring the surfaces with the pasta flour.


Once it's all rolled out and cut, hang the noodles on something and let them dry a little. My dad uses a ski pole; we used a hockey stick. Whatever you use, just make sure it's clean! This amount of pasta gives you lots of leftovers--to keep them, nest them in ziploc bags and toss them in the freezer. (If you don't have a pasta maker and want uniform noodles, flour the rolled-out pasta sheets well and them roll them up. Then, with a sharp knife, cut at the width you want your noodles! This way they're a uniform width the whole way through without you having to be really obsessive about cutting straight lines.)


Boil the pasta for a few minutes (fresh pasta cooks so fast!) and toss it with some sauce to coat. Then let everyone add more sauce to their liking and pick the pieces of meat they want out of the pot. (I keep wanting to call it a bucket because it's so huge.) Sprinkle with cheese, mix everything up, cut the meat into bite-size pieces, whatever you want--just enjoy your meal, you've been working on it all day!

UPDATE: When I first posted this I'd totally forgotten where I read the tip about rolling up the pasta sheets, but I googled it and found it! If you're making pasta without a machine, whether it's whole wheat or not, go here for some more great tips and an overall lovely blog. :)

Thank you so much, Mike, for letting me share your awesome family recipe here!