Tuesday, September 28, 2010

Leftovers for Breakfast

I think I've mentioned here before that I don't often make breakfast. If I wake up early enough that breakfast is warranted, I either get a latte or eat whatever's left in the fridge from the past few nights. For example, this morning I ate a slice of cold pizza! And I know I mentioned eating the leftover yaki onigiri cold for breakfast. I'll also eat stir-fries, salads, baked goods--whatever is there and doesn't have to be prepared beyond maybe heating up for a minute or two.

Anyway, after a super late night on Saturday (Mike and I didn't get home until 4am after Cabaret and it was soooo amazing and Amanda Palmer puts on a damn good show and I had a drink with absinthe in it and it turns out I don't like absinthe), we slept late and I was in the mood for a real breakfast. Enter the leftovers from the night before--I was really glad, in the morning, that I'd been too rushed and afraid to make the Chicken Creole with an entire cut-up chicken, as per Becky's recipe. Because we ate all the chicken that I cooked in it, we had a whole bunch of the sauce left over, and I had a vision for that sauce.

Creole-Poached Eggs.

With well-buttered rye toast from my favorite bakery.

The recipe for this is basically "make Chicken Creole, have leftover sauce, crack some eggs into it and simmer until the eggs are cooked to your liking." It took maybe 15 minutes to whip up and we had a wonderful Sunday breakfast. At 1pm. And as far as I'm concerned, that's still breakfast because I had to drag Mike out of bed for it. (Hey, it was really only around 8 hours of sleep.)

This has completely cemented in my mind the importance of making big one-pot meals. You can poach eggs in the leftovers. I intend to try to find something else that I can do this with soon, because runny yolks mixed with vegetable-y sauce on delicious bread is possibly the best way to have breakfast, ever. And that huge pile of food is almost completely vegetables! It's even healthy!

Okay, so I'm super excited remembering this and now I'm sad that I don't have anything to poach eggs in for dinner. (And I really want to make huevos rancheros soon!) What does everyone else here eat their eggs with?

Friday, September 24, 2010

Taste&Create: Chicken Creole

It's time for this month's Taste&Create! This month, I was paired with Becky of Baking and Cooking, A Tale of Two Loves. I went through her archives and found that her very first recipe, "Sunday Chicken Creole," is exactly the type of thing I would do if I knew anything about 1-pot cooking, which I don't. But looking over the recipe, I was pretty convinced that I'd love it: peppers, tomatoes, onions and garlic. I mean, that's how I cook. So I'm pretty sure this is at the last minute (or perhaps even late--which I feel bad about, but my classes are INSANE this semester; I think I'll be not doing Taste and Create for the next two months).

So basically, this is an extremely easy meal. And people around me are talking too much for me to type (and I'm in a huge hurry, as usual), so here's a recipe and some pictures!

RECIPE: Chicken Creole
adapted very slightly from Baking and Cooking, A Tale of Two Loves

Ingredients:
-4 large chicken breasts
-3 tbsp olive oil
-2 cups chopped red onion
-2 small green peppers, chopped
-4 sticks celery, chopped
-5 cloves garlic
-2 tbsp chili powder
-2 tbsp paprika
-1/2 tbsp smoked paprika
-2 28-oz cans whole tomatoes in puree (Cento's San Marzano tomatoes are in puree; I found that they generally didn't say what the tomatoes were in unless you looked closely at the ingredients. If you can't find them in puree, drain the liquid and use a can of tomato sauce.)
-1/2 cup white wine

Instructions:
1. Chop the peppers, onions and celery. Put them and the minced garlic in a large stockpot with the olive oil and saute for three minutes.
2. Add the paprika, smoked paprika and chili powder and cook for another three minutes.
3. Put in the wine, tomatos, black pepper and chicken. Simmer for 35 minutes until the chicken is cooked thoroughly.
4. Serve over rice.

Step 2!

Also step 2! This smelled so good. I'm just discovering a love for paprika--it's so exciting!

Step 3: It's almost done! Yay!

You can't even see the rice. I should have made more, but this was delicious! I was happy with how it came out.

I tend to chop everything up and mix it together. It worked pretty well for this. The chicken was super tender and all the flavors had fully permeated everything. It was delicious!


Hah! Simple. Dinner that takes less than an hour, and it's so easy for a weeknight when you don't have a lot of time. Which I don't. And even the blog post didn't take much time! YAY! Mike and I are off to see Cabaret now, so go check out Becky's blog--she's got some great recipes on there! (She's got bacon cupcakes in there somewhere, too!)

I hope everyone has some exciting plans for the weekend! I'll be doing statistics homework and writing papers, so I'm glad I'm at least starting it out on a good note!

Monday, September 20, 2010

Yaki Onigiri--Japanese Fried Rice Balls

This is another one of those recipes that I grew up eating. My uncle moved here from Japan. I'd love to say that this means I grew up familiar with lots of different Japanese foods, but really it means I learned how to say "I farted" in Japanese at a very young age, tried to eat a sheet of seaweed once and thought it was disgusting, and got really excited whenever yaki onigiri (which I always just called rice balls) were part of dinner when we were visiting them. I don't clearly remember the rest of the dinner; the rice balls were the key component. I'm sure there were Japanese elements to the dishes, but we never ate something that I thought was really weird (at least, until I was old enough to appreciate it).

I decided at some point to make the rice balls I remembered from my childhood myself. I thought it would be hard to figure it out; luckily, I remembered what the Japanese name for them was and a quick Google search was all I needed to find sufficient instructions, and from there I discovered that the method itself is extremely simple. I wouldn't say I've mastered the technique--I mean, I've made them once. They burnt a little bit, and when I told my uncle he told me that I should make them on the grill next time (well, I guess that'll have to wait until next year--it looks like grilling season is just about over). They were, though, the thing I was looking for.

Yaki onigiri are densely-packed balls (or triangles, or whatever shape you feel like) of sushi rice, grilled or pan-fried with a bit of oil, brushed with soy sauce. That's it. They're such a simple concept, but the flavors involved blend together, the outside forms a nice crunchy shell and the inside somehow becomes almost creamy in the cooking process. Granted, I've never just eaten plain onigiri, but I don't usually think of rice as creamy (not even the rice wrapped around the sushi I get, which I imagine is what I'm using here) so it's an interesting juxtaposition against what you expect. Apparently it is fairly common to get (or make) these stuffed, as well, which would add another layer of complexity that I'm not quite ready for (and don't really feel is necessary).

RECIPE: Yaki Onigiri

Ingredients:
-Sushi rice, prepared according to instructions on package (note that sushi rice is NOT cooked by the "normal" rice ratio of 1 cup rice to 2 cups water; my bag had me use 2 cups rice to 2 1/2 cups water), as much as you want to make
-Cooking oil (I used extra virgin olive oil because it's what I have; a vegetable or peanut oil would probably be more authentic)
-Soy sauce or tamari

Other Requirements:
-a bowl of cold water
-a basting brush of some sort
-a grill or frying pan
-onigiri molds or cookie cutters (totally optional)

Instructions:
1. Prepare sushi rice and roll into balls. (Make sure your hands are dipped in cold water to prevent the rice from sticking to them.)
2. Put in a hot, oiled frying pan or grill for a few minutes until lightly browned on one side.
3. Flip. Brush with soy sauce. Allow to lightly brown on this side, too.
4. Flip. Brush with soy sauce. Cook for about 1 minute.
5. Flip. Cook for about 1 minute.
6. Remove from pan.

Step 1: Sushi rice, just finished cooking, fluffed with a fork.

Also Step 1: The rice was too hot to touch at first, so I packed it into little heart-shaped cookie cutters with a fork. It took SO much time that it probably wasn't worth doing, but if I do it again, I'll pack it denser next time.

Step 2: in the pan. This is what the rest of mine looked like. Apparently "round" isn't the traditional shape, but it's what I'm used to and it's tasty, so I can deal.

Step either 3 or 4: Lightly browned and brushed with soy sauce. This side still has to cook for a tiny bit more.

Post-Step 6: The "Eat" step. They're a tiny bit darker than they should be, but they were still super tasty. I love crunchy rice.

Wow! Okay, that was super simple. If you're cooking a lot of them at once, the brush-then-flip thing can get sort of tricky and you'll have to move quickly, but other than that this is easy. Note that it's best to roll the rice into balls as soon as you can after it's done cooking. The site I found these instructions on used cookie cutters as molds, which I found worked really well right when the rice finished--I could use a fork to pack the cookie cutters without burning myself. If you do this, make sure both the fork and the cookie cutter have been rinsed in cold water first. When it comes to the soy sauce, I would recommend not drenching the rice in soy sauce unless you and everyone else you're cooking for really really likes soy sauce. It's a lot easier to just brush a little bit on and leave the bottle on the table for people who want more than it is to make a whole new batch if someone thinks they're too salty.

Yaki onigiri can be made as large or small as you like, in whatever shape, with whatever filling and whatever amount of soy sauce. They're actually quite versatile when you consider that it's just rice! They work well as either a side dish or an appetizer, or even a meal if you're lazy and don't care about getting proper nutrition. They're also finger food! Eat them with your hands. It's important.

I served these with my peanut-sauce panko pork chops and they were delicious together. I bet pretty much any recipe that involves some sort of Asian fusion element would do well with these as a side or appetizer. I also ate them cold for breakfast the next morning, which was just as wonderful.

School's already keeping me super busy (well, and for some reason I've had busy weekends). I'm trying to cook and update but it's hard to find the time! I hope you guys forgive me. I think it'll be easier once I settle into a schedule (and start reading some of my new cookbooks!). Right now, I'm trying to enjoy the last few days of summer, but also wishing the weather would make up its mind! It's at that point where it's getting cold at night so when I leave in the morning I want long pants and long sleeves and a sweatshirt but I'm dying by the time I get out of my first class. How is everyone else enjoying their last moments of summer?

Thursday, September 9, 2010

Chocolate Pudding, College-Style

So my classes started up yesterday. Hooray! I'm actually excited. So far, I like them all. Then again, I've only had 3 (out of 5) and only one session of each of those, so I might be completely wrong. I'm probably going to be super busy this semester with all my writing classes, but I'm going to do my best to update here at least once a week. Which really just means cooking something new at least once a week, which I'm usually good at. Recently I've been lazy. I blame knowing that school was about to start and allergies. Anyway.

Since I commute to school, I don't suffer from cafeteria food the way that most college students do. There was, though, a time when I lived in a dorm and had to eat at the dining hall for every meal. Our dorms didn't have any kitchenettes or anything, either. All we had was a refrigerator (mine was usually filled with Mountain Dew) and a microwave (for making Annie's Microwaveable Mac & Cheese). No toaster. No stove. Darkness, desolation. Borderline starvation. (Okay, so I'm exaggerating here, but you get the point.) I wasn't as into cooking then as I am now--I always liked cooking, but I never spent time clicking around the internet looking for new things to make. Which is good. If I had, I would have become increasingly disappointed that I couldn't make anything. So today, I'm going to share with you all something I could have made back then, and something that those of you who are in college and don't have access to much in terms of appliances can make now.

A few weeks ago, I was bored on the internet and saw something that mentioned chocolate pudding. I'm not sure why, but I pretty much immediately needed to make chocolate pudding. I was about to go search for recipes when I thought, "Wait, I'm at Mike's house. He doesn't have things like heavy cream and a double boiler to make pudding with." I almost didn't even look, but I remembered that I had a little bit of cream left there from a cake I'd made, and maybe--just maybe--it would be enough to make pudding. Boy, was I surprised when I found that the top chocolate pudding recipe on Food.com didn't use cream at all. In fact, it called for skim milk. The total calories from fat in one serving of this recipe is seven. Seven calories from fat. In PUDDING. So not only can you make this in your dorm room, but you won't get fat if you eat it every day.

If you're at home, and you really don't feel like making stuff in a microwave, you can do this in a double-boiler. It's really not necessary, though. This was excellent pudding.

RECIPE: College Kid Chocolate Pudding
very very slightly adapted from food.com

Ingredients:
-1/3 cup sugar
-1/4 cup cocoa powder (I used Hershey's Dark cocoa powder. It's not any more expensive and it tastes SOOOOO good. If you like dark chocolate, I highly recommend it.)
-3 tbsp cornstarch
-1/8 tsp salt
-2 cups 1% milk (I know I said the recipe calls for skim, but I prefer to write what I actually did, and we drink 1%--use skim if that's what you have.)
-1 tsp vanilla extract (optional--I left it out because by the time I was supposed to add it, the pudding was way too thick.)

Instructions:
1. In a large microwave-safe bowl, mix sugar, cocoa powder, cornstarch and salt. Make sure you mix thoroughly. If the cornstarch isn't incorporated into everything else, it'll clump when you add the milk and not come apart and your pudding won't thicken.
2. Add the milk and whisk (with a fork, if you don't have a whisk, which I imagine most college kids don't.)
3. Microwave on high for 3 minutes. Remove and stir.
4. Microwave for another 2-6 minutes, for one minute at a time, removing and stirring after each minute. (The original recipe says 4-6 minutes. I thought it looked plenty pudding-y at 2, though, and after 4 it was too thick to add the vanilla.) When it's thick enough, add the vanilla and stir it in.
5. Separate the pudding into 4 dishes (bowls, coffee mugs, solo cups, whatever) and refrigerate until cold.
6. Serve, topped with whipped cream (if you have it or can steal it from the cafeteria) or just normal cream (if you have it; you probably can't steal this one).

Step 1: Dry ingredients in a bowl.

Step 2: After you add the milk, the dry ingredients will probably make it look really foamy, almost sponge-y. This might also be a side-effect of using the whisk instead of a fork. Regardless, it's okay.

Step 3: Action shot! I wanted to capture how it looked a lot darker under the thin layer of bubbles. This is right after it came out of the first 3 minutes of microwaving.

Step 4: This is after 4 minutes of microwaving. I don't think it needed to be this thick, but it was delicious, so I guess don't hesitate to over-thicken it if you're not sure.

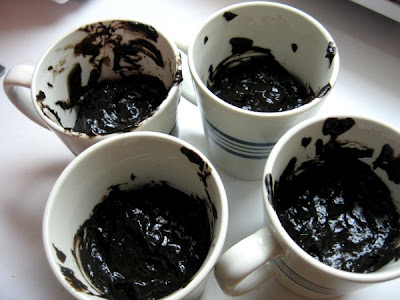
Step 5: I like my pudding in coffee mugs. And if you're a normal college student, you probably have a few of them lying around. The important thing here is, I know there are people out there who can put pudding into serving dishes without making it look like a complete mess. Would any of those people like to volunteer to teach me? Because I clearly need help. (Though, fellow college kids, you probably don't have to worry about what it looks like. Anyone you're feeding this to should be happy enough just to have homemade pudding.)

So there you have it. The easiest pudding to make, EVER. Were you confused when I said you can serve it with just cream? Because Mike was sort of confused when I poured some cream onto mine. I'm not sure why I do this except that I grew up doing it, and I think it tastes wonderful. It's exactly like whipped cream, except it hasn't been whipped yet.

The ingredients and supplies necessary to make this would easily fit in one cube of those wire-grate-assemble-it-yourself shelving units that I know you have in your room. It would probably cost under 10 dollars to be able to make this a bunch of times. And that guy or girl you're after will probably be totally impressed that you made pudding in your dorm room, so it's worth it.

Thursday, September 2, 2010

THIS JUST IN: I love panko!

My experience with panko bread crumbs has been, until recently, extremely limited. It seems that some of the sushi I enjoy is covered in them, but that was really about it. Luckily, this changed fairly recently after Mike's roommate bought some and allowed me to use it to make pork chops. I didn't even document it because I didn't think it'd be all that exciting--just breadcrumb-covered pork chops, right? But they were SO good, and this method is simple and super adaptable. (You could use normal breadcrumbs if you want, too, but it's not as exciting.)

My usual "let's bake some chicken or pork" recipe can be found here (I used to post things on recipezaar before I started this blog). It's really simple and comes out nice and crispy, but I'm glad to be able to change it up once in a while, and for some reason, the panko discovery makes that a lot easier. I guess I'm reluctant to use anything aside from the egg/mustard sauce with normal breadcrumbs, but panko just seems more versatile. The only problem with writing up this recipe is that I'm a terrible judge of how much panko I'll need to cover everything, so I pour some in a bowl and have Mike add more as I need it and I therefore have no idea how much panko I end up using. This method works fine, as long as you know you have enough panko--less than a cup for 3 or 4 pork chops and you'll probably need to get more. (Actually, the same could be said for the sauce, but it's probably closer to half a cup before you need more.)

So, my new pork chops, with two different sauces! Hooray!

RECIPE: Panko-crusted Pork Chops
by me

Ingredients:
-3 or 4 pork chops
-about 1/4 cup flour
-at least half a cup of some type of sauce (I have used barbecue sauce and Bangkok Padang Peanut Sauce and loved them both; if you want to use something thin [like teriyaki or something] maybe simmer it with some cornstarch to thicken it.)
-at least 1 cup Panko bread crumbs

Instructions:
1. Find three small bowls (like you would eat cereal out of, unless you're one of those people who eats cereal out of a HUGE bowl). Put the flour in one, a decent amount of the sauce (about 1/4 cup) in another, and about 1/2 panko in the third. Spray a baking sheet.
2. Trim as much fat as you can off the pork chops. I find it works best to coat them one at a time, so:
3. Take the first pork chop and dredge it in the flour until it's almost completely white. Then dip it in the sauce and cover it--the amount of sauce you put on it will, of course, determine how strong the sauce's flavor is, so if you want subtle flavor, try to completely cover it with as little sauce as possible, and if you want lots of flavor, see how much sauce you can get to stick to it. (I've tried brushing the sauce on instead of dipping. It didn't work nearly as well and it was a lot messier.) Then put your pork chop in the panko and cover completely. Place the pork chop on the baking sheet.
4. Repeat step 3 with the rest of the pork chops, adding more panko or sauce to the bowl as needed. (It's nice to have someone else to help with this so you don't contaminate the containers with your meat-hands, but if that's not possible, wipe them down with a disinfectant afterward.)
5. Bake at 350 degrees F for 30 minutes. Let cool for a few minutes and then eat! With...sides that are appropriate for the sauce that you used.

This is the time I tried brushing them. It wasn't all that bad, but I prefer the dipping method.

I forgot I used my brownie pan! Works just as well as a cookie sheet, just smaller. But it probably wouldn't work for four pork chops.

Rice pilaf and corn seemed appropriate sides for the BBQ ones.

I thought one picture that showed how they all looked at each stage would be appropriate, even though it was sort of annoying to set up. Keep in mind that when you pick them up to move them to the next bowl, your fingers will remove some of whatever you just covered them with. It's okay, though. (This one's the peanut sauce. Yummy!)

The finished peanut one! Somehow the panko stuck better here, but that's probably my fault. I think we ate corn with it again, because, well, summer. And yaki onigiri, which I'll be posting soon.

Okay, so this is so simple that it seems weird to even have a blog post for it, but I have to talk about why I love it. I'm not sure if I mentioned this in my spare ribs post, but I really don't like barbecue sauce in most situations. (Acceptable uses for barbecue sauce: ribs.) However, this recipe--even with a lot of sauce--comes out with such a subtle flavor that it's wonderful. It doesn't overpower the pork (which is why I usually don't like it), it complements it and allows you to enjoy both flavors. I think the peanut sauce flavor came through a bit more, but it still wasn't overpowering. Pork chops get a bad reputation for some reason, but they really do have an excellent flavor on their own. (I really mean on their own--when Mike makes them, he just tosses them in a frying pan until they're done and browned on both sides. I was skeptical at first, and I usually cover them with pepper, but they're super tasty! And I cover everything with pepper.) So, I love having a way to make them that adds another flavor without destroying the pork's flavor completely, and this is perfect for that. And the panko! It's so different from normal bread crumbs--it won't get soggy and there's way more texture. The flavor's really different, though I'm not quite sure why.

I seem to have failed at both a Friday update AND a Tuesday update. I've been super distracted, trying to enjoy the last two weeks before classes start up again on the 8th. I can't believe it's already September! My birthday's on Saturday, AHHHH! (On the plus side, I get sushi and cake. And probably crayons. Yes, I asked for crayons for my 23rd birthday, what of it?)